Abstract
The aim of this tutorial is to explain the implementation of a common user case when purchasing a SaaS product: the creation of a user account after the purchase. SaaS solutions rely on online user authentication to use their products. More often than not, integrating your eCommerce platform with your user creation process in your backend can be painful or even not possible at all.
We will see how easy it is to achieve this process with FastSpring. We will leverage on standard JSON based webhooks and API calls to achieve a seamless integration so that buyers can start using the product as soon as they complete their purchase.
High level overview
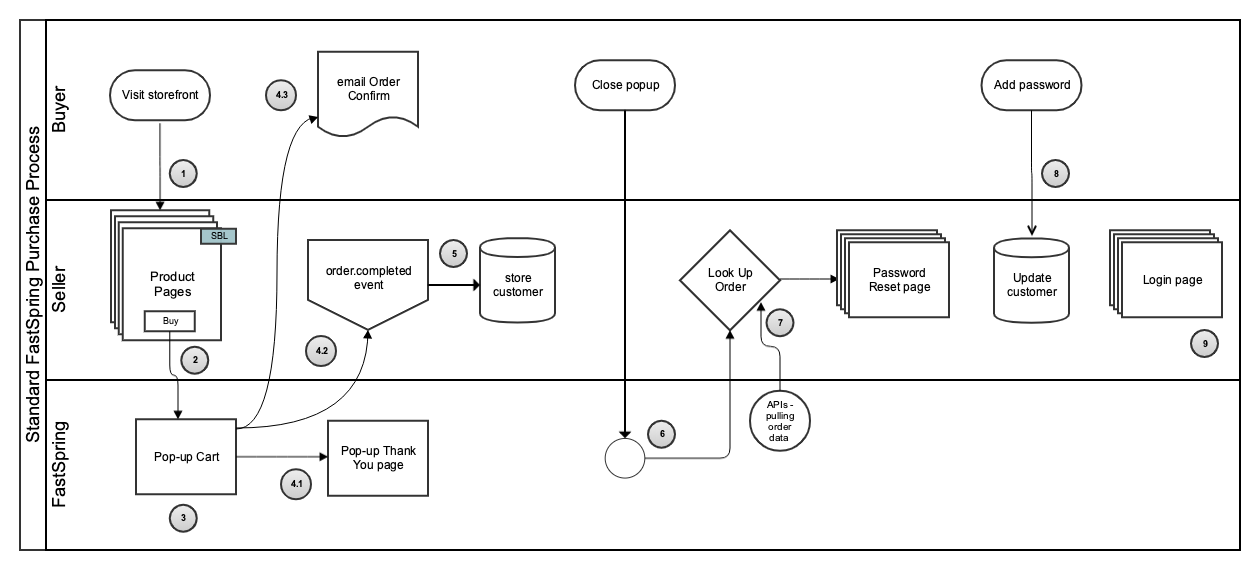
The above diagram depicts the standard Buyer-Seller-FastSpring flow in a swim-lane diagram. Let’s look at each step in more detail:
- The Buyer visits storefront. The storefront pages hosted by the Seller displays products’ information using FastSpring SBL interface.
- After selecting one or more products, the Buyer hits the buy button which opens up the popup storefront.
- Inside the popup storefront hosted by FastSpring, the Buyer inputs their data and proceeds to checkout.
- If the order was successful three things occur almost simultaneously:
- The “Thank you” popup appears.
- An order.completed webhook event is fired off.
- Buyer receives an email with the fulfillment and receipt of the order.
- From the JSON object within the webhook event we retrieve the customer data and store it in our database.
- When the Buyer closes the Popup Thank you page, a callback function is triggered in the browser which contains the id and reference of the order. The Seller then extracts the order ID and sends it to their backend.
- In the Seller’s backend, given the order ID, the Seller makes use of the FastSpring API to get information about the order. The Seller checks the Buyer who made this transaction and checks in their own database whether it exists and does not have a password set yet.
- The Seller directs the Buyer to a new page where she can finish the account creation by offering her password.
- After storing the Buyer’s password, the account is completely finished in the Seller’s backend. Now the Buyer can login to use the newly purchased SaaS solution.
One thing to notice is that when the order is completed (step 4) the order.completed webhook event will be fired off. Most of the time, your server will receive this information almost instantly. However, webhooks generation is queued, which means that depending on the current workload of the FastSpring servers it may take a bit longer than usual to reach your backend. It’s for this reason that we wait until the user closes the popup to check our database. This gives us some extra time and provides an optimal user experience.
Implementation
Prerequisites
For this specific tutorial we will be doing the implementation in Node (“>=v11.0.0”). For installing all the necessary third party modules we’ll be using the default Node package manager npm.
To keep things simple, we will use a plain JSON file to represent our database.
Implementation steps
We will divide the implementation in three phases:
- Completing a purchase: add the bare minimum code to complete a purchase in our test storefront.
- Using webhooks to create an account: set up an event listener to add a customer to our database.
- Resetting user’s password: based on data-callbacks we will redirect the user to a reset password page.
All the code is readily available in the following repository.
Phase 1. Completing a purchase
In order to display the popup storefront to complete a purchase the page needs to be served over HTTP/S. Let’s start by setting up a basic local server to act as the backend of our application. Create a folder for the project (e.g_ FSAccountCreation_) and initialize it with npm:
mkdir FSAccountCreation && cd FSAccountCreation && npm init
We’ll be using the Express module to support our server:
npm install --save express
Next, we’ll create our file index.js which will act as the entry point of our server. For now, it will only serve static files which will be located in a public folder that we create at the root directory.
const express = require('express');


const app = express();
app.use(express.static('public'));

const port = 8000;


app.listen(port, () => console.log(`App successfully listening on port ${port}!`));
Create the public folder:
mkdir public
Inside the recently created public folder, add a file store.html This file will hold the frontend of our storefront. For now we will add the bare minimum code:
<html>
    <body>
        Hello there! Store in construction
    </body>
</html>
Let’s test that our server is working fine. Execute the app by running node index.js in the command line and open up http://localhost:8000/store.html. You should see the following:
Now we’ll add our Store Builder Library to our store.html page. This will allow us to pull information about our products from our store and provide the popup checkout in order to complete the purchase. For this tutorial we are pointing to our official FastSpring example store, which is documented here at the reference site fastspringexamples. In your case, replace the data-storefront value to point to your store:
    <script
        id="fsc-api"
        src="https://d1f8f9xcsvx3ha.cloudfront.net/sbl/0.7.9/fastspring-builder.min.js"
        type="text/javascript"
        data-storefront="fastspringexamples.test.onfastspring.com/popup-fastspringexamples"
    >
    </script>
We’ll make use of the data-fsc-action HTML directive to add one product (“photo-io-main-app”) and launch the popup checkout. Once again, in your case choose one of your products already defined in the dashboard.
This is what we have so far in store.html:
<html>
    <script
        id="fsc-api"
        src="https://d1f8f9xcsvx3ha.cloudfront.net/sbl/0.7.9/fastspring-builder.min.js"
        type="text/javascript"
        data-storefront="fastspringexamples.test.onfastspring.com/popup-fastspringexamples"
    >
    </script>
    <body>
        <button data-fsc-item-path-value="phot-io-main-app" data-fsc-action='Add, Checkout'> Buy </button>
    </body>
</html>
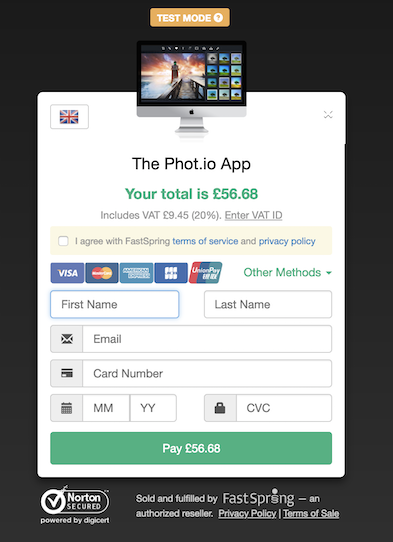
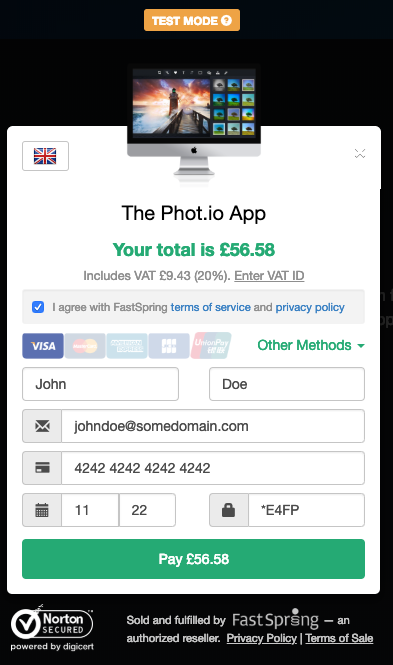
Now we can complete the purchase with the popup checkout. Reload the page and click on the buy button. When the popup displays you can complete a test order using the following test credit card details:
- Card Number: 4242 4242 4242 4242
- CVV code: *E4FP
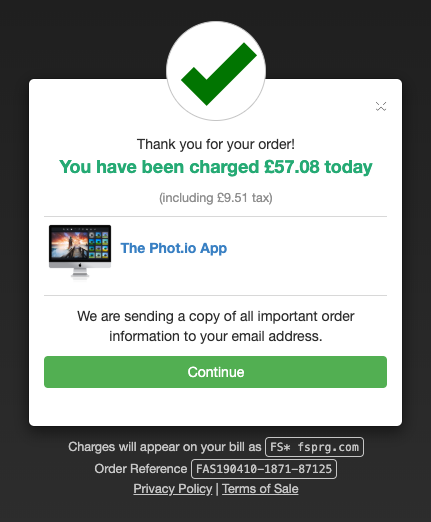
After the order is completed you will see the Thank you popup:
Phase 2. Using webhooks to create an account
Now that we can complete a purchase, the next thing we want to do is to create an account in our backend so that the buyer can log into our system.
We will use the order.completed webhook which is fired off every time a new purchase is completed. At FastSpring accounts are uniquely identified by their email address.
Webhooks’ information comes in JSON format. We need our server to be able to parse JSON requests correctly. Express comes with a built-in middleware to do just that, we just need to add the following line of code to our index.js file:
app.use(express.json());
FastSpring will send webhook information via POST HTTP method. We will start creating an endpoint called processor to process such information. For now it will just return a simple ‘Hello World’ message:
app.post('/processor', (req, res) => {
	res.send('Hello World!');
});
Let’s test that everything is working fine. Restart your server and send the following dummy request with curl command in the command line:
curl -d '{}' -X POST http://localhost:8000/processor
You should receive ‘Hello World’ as response.
Now that our endpoint is working we’ll subscribe to the order.completed event in the FastSpring dashboard once our setup is completed. First, we need to make our local server publicly accessible through an SSH tunnel. I like to use ngrok for that. Because our server is open at port 8000 let’s create a tunnel in that port. In the command line enter:
./ngrok http 8000
Ngrok will return a random public address. In my case ‘https://c563f123.ngrok.io’. We’ll continue the tutorial using this address but remember to replace it with the one you got assigned.
It’s important that we always acknowledge the webhook, otherwise FastSpring will keep resending it over time to make sure you have processed it (more information about marking a webhook as processed an webhook retries can be found here).
To acknowledge a webhook has been received, we will wrap our code into a try/catch/finally block and always send a 200 HTTP status code in the end. For now we will just log the full request object to see what information we should get from it:
const util = require('util'); //import util module
//...

app.post('/processor', (req, res) => {
    try {
        console.log(util.inspect(req.body, false, null, true));
    } catch (err) {
        console.log('An error has occurred while processing webhook: ', err.message);
    } finally {
        res.sendStatus(200);
    }
});
You can test that the SSH tunnel works by sending a request with an empty object to the public address. In the command line:
curl -d '{}' -X POST https://c563f123.ngrok.io/processor
You will see the object {} being logged in your server’s process and a 200 OK status code as a response.
Now let’s go to our dashboard and subscribe to the order.completed webhook event in the FastSpring dashboard(for more about subscribing to webhooks visit here)
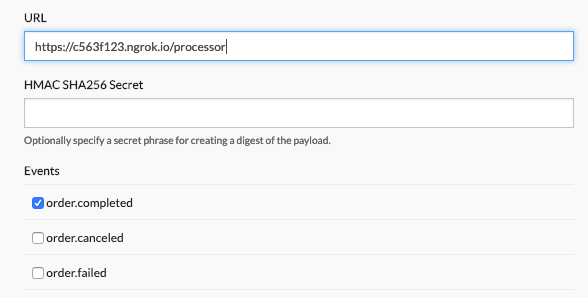
In the URL field we have specified the public address randomly assigned by ngrok. Once more, remember to change that with the one you have been assigned.
Let’s now test our webhook! To do that, we will complete a purchase with an email address we haven’t used yet in our system.
You should see the event information being logged in your server’s thread:
{
    "events": [
        {
            "id": "RkJIuFQiRbuSkikOaQN3fQ",
            "processed": false,
            "created": 1551955974727,
            "type": "order.completed",
            "live": false,
            "data": {
                "order": "ALoHLQYESueh6RB9Fngu2A",
                "id": "ALoHLQYESueh6RB9Fngu2A",
                "reference": "JAVIERTRUJILLO190318-5365-39162",
                "buyerReference": null,
                "completed": true,
                "changed": 1552921249720,
                "changedValue": 1552921249720,
                "changedInSeconds": 1552921249,
                "changedDisplay": "18/03/19",
                "language": "en",
                "live": false,
                "currency": "GBP",
                "payoutCurrency": "USD",
                "invoiceUrl": "https://javiertrujillo.test.onfastspring.com/account/order/JAVIERTRUJILLO190318-5365-39162/invoice",
                "account": "nX9n1B8MQ-WMczVhnebKBA",
                "total": 5,
                "totalDisplay": "£5.00",
                "totalInPayoutCurrency": 6.42,
                "totalInPayoutCurrencyDisplay": "USD",
                ...
                "customer": {
                    "first": "cascdas",
                    "last": "cdacdas",
                    "email": "ha@fwa.com",
                    "company": null,
                    "phone": "+31617282299"
                },
                ...
            }
        }
    ]
}
We will use the account Id as the unique id to store the customer object which contains basic information about the buyer.
Now that we have verified that we are receiving webbook information in our endpoint, let’s add some logic to add new customers to our database. For our example we will just write the data to a file on disk that will represent our database. Create a file called db.json inside a new folder database in our root directory. This file should initially contain just an empty object:
{}
We’ll also create a very simple util to act as the database driver. It will basically contain a couple of methods to read and write on the JSON file. Create a new folder utils at the root directory with one file DBdriver.js:
const path = require('path');
const fs = require('fs');

const dbLocation = path.resolve(__dirname, '../database/db.json');

const getContent = (() =>
    JSON.parse(fs.readFileSync(dbLocation, 'utf8'))
);

const writeContent = (content =>
    fs.writeFileSync(dbLocation, JSON.stringify(content, null, 4), 'utf8')
);


module.exports = {
    getContent,
    writeContent
};
Inside our processor endpoint we’ll add the code needed to get the customer data from the order.completed event. As we just said, we know that the data will be under the data.customer object key. We will key our customers by their accountId and add the customer information to that object.
const DBdriver = require('./utils/DBdriver'); // add db util

//other requires…

/* POST /processor
 * Processes order.completed FastSpring webhook to add buyer's account information
 * to database.
 *
 * @param {Object} - order.completed event https://docs.fastspring.com/integrating-with-fastspring/webhooks/order-completed
 * @returns {number} - Acknowledge event with 200 HTTP status code
 */
app.post('/processor', (req, res) => {
    try {
        // Check that request contains an events object
        if (req.body && Array.isArray(req.body.events)) {
            req.body.events.forEach((event) => {
                // Only process order.completed events
                // Check that the order was successfully completed
                if (event.type === 'order.completed' && event.data.completed) {
                    // Get FastSpring assigned accountId
                    const accountId = event.data.account;
                    // Let's check that this user is not already in our database
                    const dbContent = DBdriver.getContent();
                    if (Object.keys(dbContent).indexOf(accountId) < 0) {
                        // Add new user to our database file
                        dbContent[accountId] = event.data.customer;
                        DBdriver.writeContent(dbContent);
                    }
                }
            });
        }
    } catch (err) {
        console.log('An error has occurred while processing webhook: ', err.message);
    } finally {
        // Always make sure to acknowledge event
        res.sendStatus(200);
    }
});
Let’s test it out! Restart the server and complete a new purchase with an email address you haven’t used previously. Now if you look at the db.json file a new entry will have been added: entry in your database:
{
    "nX9n1B8MQ-WMczVhnebKBA": {
        "first": "John",
        "last": "Doe",
        "email": "johndoe2@somedomain.com",
        "company": null,
        "phone": null
    }
}
Phase 3. Resetting user’s password
Now that we are capable of adding new customers to our database the last step is to redirect them to a page where they can complete their account on our site by setting a password.
We do this once the user closes the popup checkout after completing the purchase. When that happens the data-popup-closed event is fired. This callback contains the id and reference of the order just being made. We will store the orderId back to our backend. Next via the FastSpring API we check whether the customer is already in our database and has a password set. If it does, we will redirect her to their account page; if it doesn’t we will redirect her to a page where she can set the password.
Let’s start by adding the data-popup-closed callback function in the browser (you can see a more detailed explanation in this article).
We need to add the callback to our SBL script in the store.html file:
data-popup-closed="onPopupClose"
Because this callback function is called every time the user closes the popup, we need to make sure that the order was successfully completed prior to that. We achieve that by checking whether the orderReference argument exists. From that object, we’ll get the orderId and make an AJAX call to our to our new endpoint /checkOrder/[orderId] (yet to be created).
        <script type="text/javascript">

            function onPopupClose(orderReference) {
                // Make sure an order has been completed
                if (orderReference) {
                    fastspring.builder.reset();
                    // Create AJAX request with orderId
                    const Http = new XMLHttpRequest();
                    const url= `/checkorder/${orderReference.id}`;
                    Http.open('GET', url);
                    Http.onreadystatechange = function() {
                        // Check response is correct and parse the receiving JSON
                        if (this.readyState === 4 && this.status === 200) {
                            const res = JSON.parse(this.responseText);
                            if (res && res.success) {
                                window.location.href = res.redirect;
                            } else {
                                alert('Buyer not found!');
                            }
                        }
                    };
                    Http.send();
                }
            }

        </script>
Next, we create our endpoint. This endpoint will receive the id of the order as a parameter in the url and retrieve the customer associated via the /orders FastSpring endpoint. We will create another module under the utils folder, called FSApi.js, to perform GET requests to the FastSpring API. For that we will use the request-promise module but you can of course use whichever other module you feel more comfortable with. Inside the command line run:
npm install --save request request-promise
Inside our utils/FSApi.js file add the following code (make sure you replace the API credentials with your own ones in order to interact with your store):
const request = require('request-promise');

// Replace with your own credentials!
const FS_CREDENTIALS = {
    username: 'TODO',
    password: 'TODO',
};

const get = (params) => {
    let uri = 'https://api.fastspring.com';
    if (params) {
        uri = `${uri}${params}`;
    }

    const options = {
        uri,
        method: 'GET',
        auth: {
            user: FS_CREDENTIALS.username,
            pass: FS_CREDENTIALS.password
        },
        json: true
    };
    return request(options).catch((err) => {
        console.log('Request error ', err.message);
    });
};

module.exports = { get };
Now we can create our endpoint using this util. Given the orderID param provided in the url: we will query the FastSpring Order API passing in this orderID; retrieve all the order’s details; check in our database if the associate account ID exists; and decide whether we should redirect the user to the /account or /password page based on their password.
In case we are redirecting the user to the password page, we will send the accountId as a URL parameter. This will allow us to identify for whom the password will be set in the next step. As a reminder, passing in the information this way as well as not having any security checks on the endpoints is definitely not the way to go when considering a production environment. For the purpose of this tutorial it works since we can showcase an example implementation.
Start importing the FSApi module in our index.js file:
const FSApi = require('./utils/FSApi');
Then we can add the endpoint:
/* GET /checkorder/:orderId
 * Check an order using the FastSpring API to retrieve buyer's information. Redirect to setPassword or account
 * page depending on whether the buyer already has a password in our site.
 *
 * @param {String} - orderId
 * @returns {Object} - Redirect user to new page based on its password
 */
app.get('/checkorder/:orderId', (req, res) => {
    try {
        // Get orderId from request params
        const { orderId } = req.params;
        if (!orderId) {
            throw new Error('No order Id found in request');
        }

        // Retrieve order from FastSpring API
        FSApi.get(`/orders/${orderId}`).then((order) => {
            if (!order) {
                throw new Error('Order not found');
            }
            // Check in database if buyer is in our database
            const accountId = order.account;
            const dbContent = DBdriver.getContent();
            if (!dbContent[accountId]) {
                throw new Error('User not found');
            }
            // User exists, check whether user has already set a password
            if (dbContent[accountId].password) {
                // User is already registered, redirect to its account
                return res.json({ success: true, redirect: `/account.html?accountId=${accountId}` });
            }
            // User does not have a password yet
            // Redirect to password page
            return res.json({ success: true, redirect: `/password.html?accountId=${accountId}` });
        });
    } catch (err) {
        console.log('An error has occurred while checking order: ', err.message);
        res.json({ success: false, error: err.message });
    }
});
Before start testing our endpoint, let’s create a very basic version of these two static pages. Under the “public” folder, create password.html and account.html:
<html>
    <body>
        Hello there! I am the password page
    </body>
</html>
<html>
    <body>
        Hello there! I am the account page
    </body>
</html>
We can now test the flow. Restart, the server and complete a new purchase. Because we haven’t set passwords for any user yet you should end up in the password page.
As a last step, we will add some logic to this password page to send the password to our backend and complete the registration process. At the very minimum, it should contain an input to set the password and a function to submit the data.
<html lang="en">
    <body>
       <input type="password" id="inputPassword" placeholder="Password" required="">

       <button onclick="submitPassword()">Sign in</button>

       <script type="text/javascript">

            function submitPassword() {
                // Check that user comes from purchasing an item by checking
                // the accountId set by the server
                const urlParams = new URLSearchParams(window.location.search);
                if (urlParams.has('accountId')) {
                    const accountId = urlParams.get('accountId');
                    const password = document.getElementById('inputPassword').value;
                    // Create AJAX request to our backend
                    const Http = new XMLHttpRequest();
                    const url= 'setPassword';
                    Http.open('POST', url, true);
                    Http.setRequestHeader("Content-Type", "application/json");

                    Http.onreadystatechange = function(){
                        if (this.readyState === 4 && this.status === 200) {
                            const res = JSON.parse(this.responseText);
                            if (res && res.success) {
                                window.location.href = res.redirect;
                            } else {
                                alert(`Error setting password: ${res.error}`);
                            }
                        }
                    };

                    Http.send(JSON.stringify({
                        accountId,
                        password
                    }));
                }
            }
        </script>
    </body>
</html>
We will send the password set by the user along with the accountId again back to our backend. If everything was successful, we will redirect the user to their account page.
We will proceed to create our last endpoint, called ‘setPassword’. It will receive the accountId and password previously set by the user and add it to the account.
/* POST /setPassword
 * Set password to a buyer based on the given accountId
 *
 * @param {String} - accountId
 * @param {String} - password
 * @returns {Object} - Redirect user to account page
 */
app.post('/setPassword', (req, res) => {
    try {
        // Make sure accountId and password are in the request
        if (!(req.body && req.body.accountId && req.body.password)) {
            throw new Error('Email or password params not found in request');
        }
        // Check that the accountId exists in database
        const { accountId, password } = req.body;
        const dbContent = DBdriver.getContent();
        if (!dbContent[accountId]) {
            throw new Error('User not found');
        }
        // Save password in database
        dbContent[accountId].password = password;
        DBdriver.writeContent(dbContent);

        // Redirect to account page
        return res.json({ success: true, redirect: `/account.html?accountId=${accountId}` });
    } catch (err) {
        console.log('An error has occurred setting the password: ', err.message);
        res.json({ success: false, error: err.message });
    }
});
To finish off, we have to add some logic to our accounts page so that it displays the account information for those buyers who are fully registered (this is, they have completed a purchase and have input the password). For those who are not registered yet, it should redirect them to the store or password page accordingly.
Let’s add the following script to our account.html:
<script>
            window.addEventListener('DOMContentLoaded', (event) => {
                // Check if user is registered based on the GET params
                const urlParams = new URLSearchParams(window.location.search);
                if (urlParams.has('accountId')) {
                    const accountId = urlParams.get('accountId');
                    // Create AJAX request to our backend
                    const Http = new XMLHttpRequest();
                    const url= 'getAccount';
                    Http.open('POST', url, true);
                    Http.setRequestHeader("Content-Type", "application/json");

                    Http.onreadystatechange = function(){
                        if (this.readyState === 4 && this.status === 200) {
                            const res = JSON.parse(this.responseText);
                            if (res && res.success) {
                                document.getElementById('accountHeader').innerHTML = 'Your account details';
                                document.getElementById('detailsDiv').style.display = 'block';
                                document.getElementById('accountMessage').innerHTML = JSON.stringify(res.account, null, 2);
                            } else if (res.error && res.redirect){
                                alert(`Error in account: ${res.error}`);
                                window.location.href = res.redirect;
                            } else {
                                window.location.href = 'store.html';
                            }
                        }
                    };

                    Http.send(JSON.stringify({
                        accountId
                    }));
                } else {
                    window.location.href = 'store.html';
                }
            });
        </script>
It basically expects the accountId to be provided in the url and sends it back to our backend to check whether the account is fully registered. If so, it will overwrite the content of certain empty elements of our page with that account information.
In the backend we add the last endpoint to actually retrieve that information:
/* POST /getAccount
 * Get account details if user is already registered. Otherwise, redirect them to
 * previous pages to complete their account.
 *
 * @param {String} - accountId
 * @returns {Object} - account information
 */
app.post('/getAccount', (req, res) => {
    try {
        // Make sure accountId is in the request
        if (!(req.body && req.body.accountId)) {
            return res.json({
                success: false,
                error: 'User not found. Please create one by purchasing a new item',
                redirect: '/store.html'
            });
        }
        // Check that the accountId exists in database
        const { accountId } = req.body;
        const dbContent = DBdriver.getContent();
        if (!dbContent[accountId]) {
            return res.json({
                success: false,
                error: 'User not found. Please create one by purchasing a new item',
                redirect: '/store.html'
            });
        }
        const account = dbContent[accountId];
        // User exists, check if it has set its password
        if (!account.password) {
            // User hasn't provided password yet, redirect to password page
            return res.json({
                success: false,
                error: 'Please complete your account providing a password',
                redirect: `/password.html?accountId=${accountId}`
            });
        }

        // Offer account information to users
        return res.json({ success: true, account });
    } catch (err) {
        res.json({ success: false, error: err.message });
    }
});
You can now restart the server and test the whole flow!
Wrapping up
Congratulations! You have just developed an application that creates an account in your backend after the user completes a purchase with FastSpring. We have covered how to:
- Add an item to the cart session and launch the popup cart using the data-fsc-action of the Store Builder Library.
- Subscribe to the order.completed webhook and parse the JSON object that is returned.
- Use the data-popup-close callback function to redirect the user when the popup is closed and retrieve the orderID for the order that was just executed from the JSON.
- Retrieve the details of an existing order with the /orders API endpoint.
To learn more about how to integrate other common eCommerce scenarios with FastSpring check out our tutorials page!